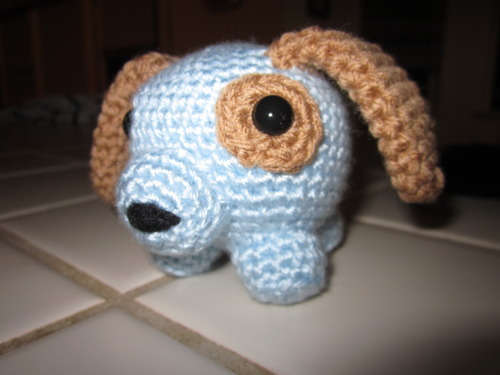
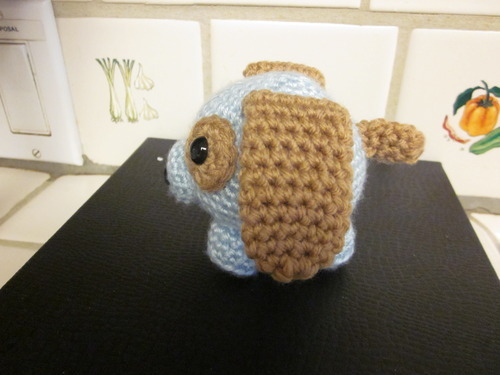
I think the Roly Poly Cats pattern by Nina Shimizu found here is super cute, but I wanted a dog version too. I took an evening and worked this pattern out, I like how it turned out. I also put a cat toy inside when I stuffed him so he rattles. :) Made two for both my cousins who had baby boys this year. Here is the link to the pattern on Ravelry: http://www.ravelry.com/patterns/library/roly-dog
I used an F hook and worsted weight yarn throughout.
This is worked in rounds, so don't join after each row. Just continue the spiral upwards. (Use a stitch marker if needed)
This is worked in rounds, so don't join after each row. Just continue the spiral upwards. (Use a stitch marker if needed)
Eye Spot - Color B:
R1: 6 sc in magic ring
R2: 2sc in each st around (12)
sl st, finish off, leave long end to sew onto body
Head - Color A
R1: 6 sc in magic ring
R2: 2sc in each st around (12)
R3:(sc 1, 2sc in next sc) around (18)
R4: (sc 2, 2sc in next sc) around (24)
R5: (sc 3, 2sc in next sc) around (30)
R6: (sc 4, 2sc in next sc) around(36)
R7: (sc 5, 2sc in next sc) around (42)
R8-15: Sc in each st around (42)
R16: (sc 5, sc2tog) around (36)
R17: (sc 4, sc2tog) around (30)
R18: (sc 3, sc2tog) around (24) - This is where I attached the eyes and started to fill with stuffing. I also added a cat toy as a rattle in the center. *Note* Make sure the safety eye goes through the Eye Spot before attaching to the head.
R19: (sc 2, sc2tog) repeat (18)
R20: (sc 1, sc2tog) around (12)
R21: Sc2tog around (6st) Cut yarn and sew up hole.
Nose - Color A:
R1: 6 sc in magic ring
R2: 2sc in each st around (12)
R3: 2sc, sc 5, 2sc, sc 5 (14)
R4: Sc each st around
sl st, finish off, leave long end to sew onto body, stuff
I used black yarn and a yarn needle to make a big black spot here for the nose.
R1: 6 sc in magic ring
R2: 2sc in each st around (12)
R3: 2sc, sc 5, 2sc, sc 5 (14)
R4: Sc each st around
sl st, finish off, leave long end to sew onto body, stuff
I used black yarn and a yarn needle to make a big black spot here for the nose.
Feet (4) - Color A:
R1: 6 sc in magic ring
R2: 2sc in each st around (12)
R3: In BLO sc in each st around (12)
R4-5: Working both loops from now on sc each st around (12)
sl st, finish off, leave long end to sew onto body, stuff
R1: 6 sc in magic ring
R2: 2sc in each st around (12)
R3: In BLO sc in each st around (12)
R4-5: Working both loops from now on sc each st around (12)
sl st, finish off, leave long end to sew onto body, stuff
Ears (2) Color B:
R1: 6 sc in magic ring
R2: 2sc in each st around (12)
R3-12: sc each st around (12)
R13: sc 6, leaving 6 unworked
sl st, finish off, leave long end to sew onto body. The ears are tubes but flatten them out so they are more like dog ears. Don't stuff this part!
R1: 6 sc in magic ring
R2: 2sc in each st around (12)
R3-12: sc each st around (12)
R13: sc 6, leaving 6 unworked
sl st, finish off, leave long end to sew onto body. The ears are tubes but flatten them out so they are more like dog ears. Don't stuff this part!
Tail - Color B:
R1: 6 sc in magic ring
R2-4: sc each st around (6)
sl st, finish off, leave long end to sew onto body
R1: 6 sc in magic ring
R2-4: sc each st around (6)
sl st, finish off, leave long end to sew onto body
Sew it all together, you can use my picture for help with placement. Also I've never written out a pattern before so I apologize in advance for any mistakes. Email me if you find any :) ktstevens90@gmail.com


this little puppy is so cute thank for sharing
ReplyDeletei have just been teaching my 11 yr old to crochet...and she wanted to crochet a dog so i think this would be fab for her thankyou.....will let you know how she got on!! xsx
ReplyDeleteHe is very cute. Thanks for the pattern!
ReplyDeleteHow quick can I make this?
ReplyDeleteIt really depends on how fast you are at crocheting and sewing it together. I can finish the pattern in an evening but I'm relatively fast.
DeleteI just finIshed my roly poly dog. He's super cute. He's a Christmas gift, so I hope the kid likes it. : ) Thanks for sharing this pattern!
ReplyDeleteRight now I'm making a pair of dogs for Valentine's Day. Both are red and white but the main colors are switched with each. They are coming together nicely. Thanks for the pattern. ^O^
ReplyDeleteim 10 and im really into amigurumi and im in the middle of my roly poly dog its a gift for my mum dad and sister and i hope they like it
ReplyDeleteim in the middle of my dog and im making some hot glue gun eyes thank you for the pattern
ReplyDeleteAdorable! What is the finished size of this cutie? Thanks!
ReplyDeleteI can't wait to make this dog! I'm making the Roly Poly cats for three of my grandchildren to match their pet cats. The fourth grandchild has a dog, so perfect. The cat makes up really quickly,so I think the dog will also. Thanks.
ReplyDeleteHey fantastic blog i m searching about this topic and i found your blog its really very helpful keep the good work thanks
ReplyDeletecotton yarn from Pakistan
cotton carded yarn exporter in Pakistan
Thx for the cute pattern! Easy to follow directions. My twin girls loved their pups!
ReplyDeleteHaving dogs as pets can play a vital role in the many activities of your life like walking, trekking and hunting. dog toy
ReplyDeleteWatching my dog play in the park brings me so much joy. Benefits of Nexgard for Small Dogs
ReplyDelete